LanDock

LanDock turns your cell phone into a fully customizable control panel for your PC.

All communication takes place exclusively over the local Wi-Fi network (LAN) - without cloud servers, without account registration and without sending your data to third parties.

Whether you are a programmer, enthusiast, presenter or want to manage media remotely more easily, LanDock makes it easier for you to interact with your computer.

Full integration with OBS Studio. Manage your stream or recording easily and productively.

Click first before downloading HERE!!

Important note!

The program is safe and virus-free.

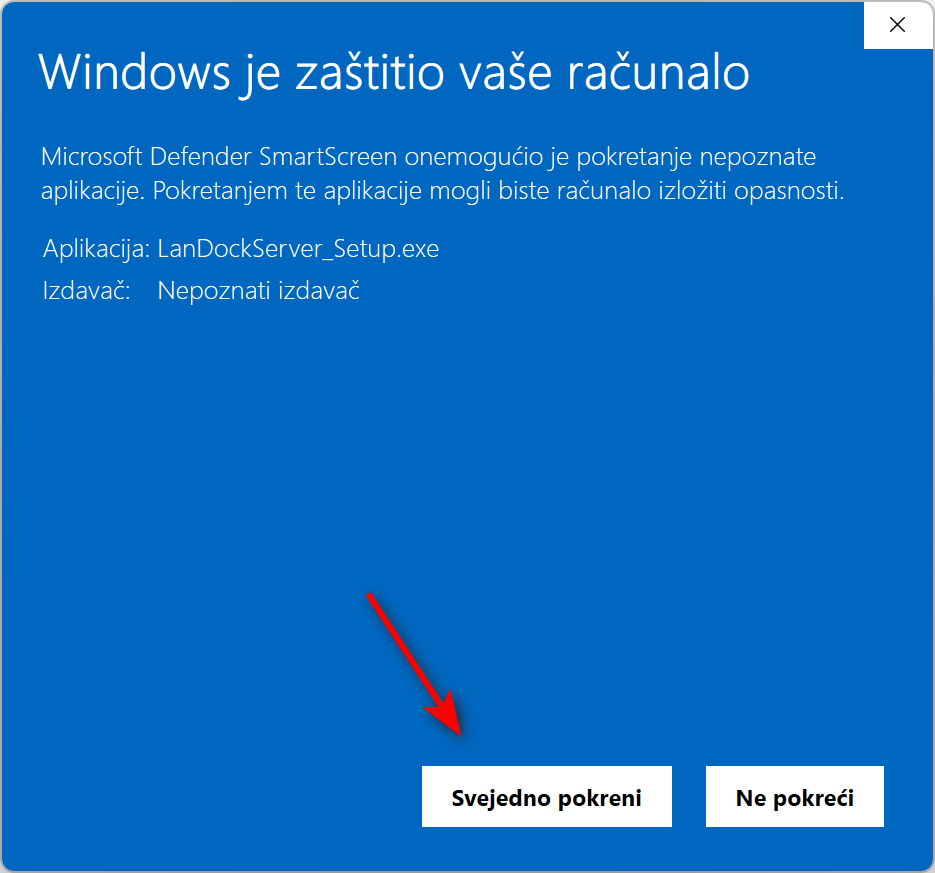
However, since I don't have a commercial certificate and the program is new, Windows may block it and warn you.

When the blue SmartScreen window pops up, click on 'More information' (More info), and then on the button 'Run anyway' (Run anyway).
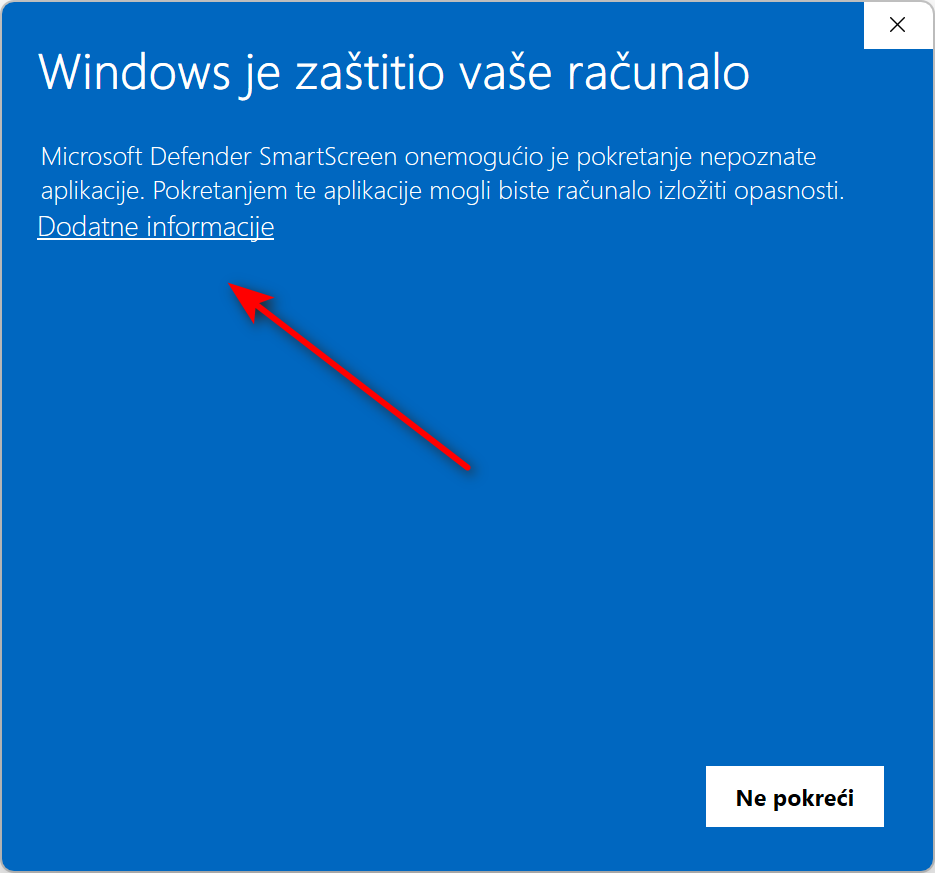
Korak 1: Više informacija
1. More information
Korak 2: Pokreni svejedno
2. Start anyway

Download the LanDock app from Google Play

Introducing LanDock: A fully customizable control panel for your Windows PC.

Have you ever found yourself in a situation where you are watching a movie from the couch and you need to turn down the sound on your computer? Or are you a developer/creative who wants to have physical keys for the most common macros and tools right next to the keyboard?

Introducing LanDock, our new app that turns your Android smartphone into a fully customizable control panel for your Windows PC.

No cloud, no subscriptions and no lag - just a clean, fast local connection.

Forget about predetermined and rigid schedules. LanDock allows you to create your own screens (so-called Panels) to which you can add buttons as desired.

You can assign a specific color, icon and name to each button, and easily move them using the built-in 'Swap' tool.

Full integration with OBS studio via Web socket server.

How does LanDock work?

LanDock consists of two parts: a lightweight server application for Windows ( LanDock server ) and modern Android applications.

The devices communicate exclusively through your local Wi-Fi network using an optimized protocol, which means that every command you make on your computer is executed instantly, without irritating latency.

Security and privacy first.

Since LanDock manages your computer, security was our absolute priority:

  • There is none Cloud: Your data and settings never leave your home network. We do not use external servers to mediate commands.

  • Local network and PIN protection: Windows server only receives commands from devices that are on the same local network (eg 192.168.x.x), thus preventing access from the Internet or unknown networks. In addition, access is protected with a 6-digit PIN. If someone online tries to guess the PIN and gets it wrong several times in a row, the server automatically temporarily blocks that device.

  • Local Backup: You can export (backup) your created panels and buttons to a regular JSON file and store them safely. You can import again later (Import/Import) saved backup JSON file.
    REMARK: Due to the security and privacy of the user, the export and import of the JSON file is done exclusively in the public folder Downloads on your mobile phone.

How to get started in 4 simple steps?

  1. Download LanDock server : Download a small application from our pages, run it and, if desired, set it to start along with Windows. The server will automatically generate your security PIN. You can change the PIN as you wish.
    NOTE: During installation, since I do not have a commercial certificate and the program is new, Windows may block it during installation and warn you.

  2. You can find the LanDock server on startup in the system tray in the right corner. By double-clicking on the icon, you can open its main window with settings. A right click on the icon offers you Settings or to close the LanDock server.

  3. Download the Android app: Install LanDock from the Google Play Store.

  4. Connect: In the Android application, open the menu (icon in the right corner), click on 'Connect Server' then click 'Scan' for the application to automatically find your PC on the network where the LanDock server is running, enter PIN and start creating your own buttons!

NOTE: When the server is successfully connected edge with under the name of Panela is green when the server is disconnected, then it is red.

What all commands can you do?

The first time you open the application, there is not a single command button.

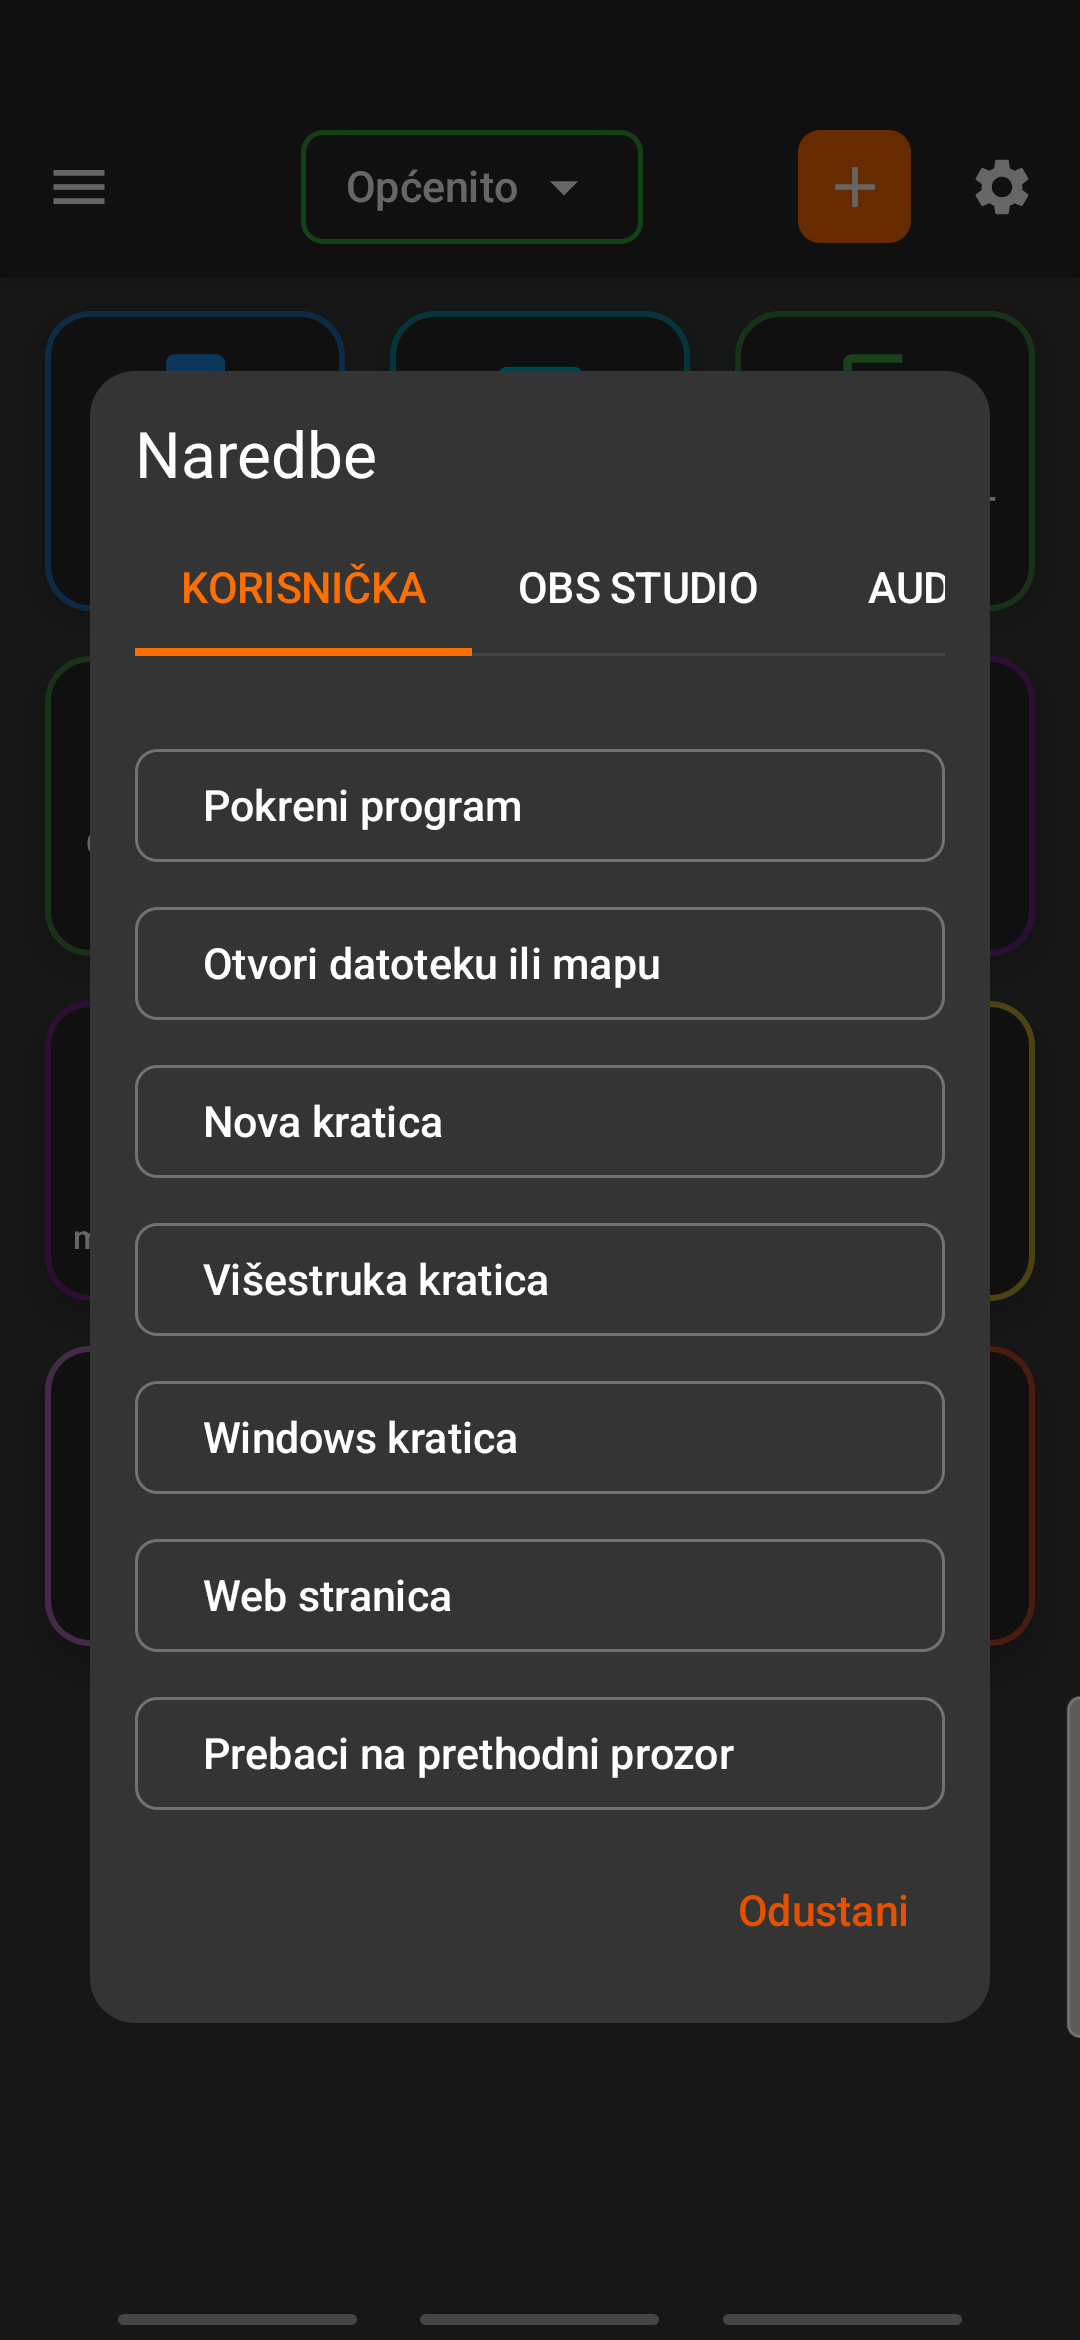
By clicking on the orange button on the top bar with the sign '+' a command menu will open.

1. User

 SPECIAL 

  1. Paste from mobile phone - this is a special command that pastes the last text that was copied on the mobile phone up to 8000 characters to your computer.
  2. Paste from computer - similar to the one above, only the last copied text from the computer is copied to your mobile device up to 8000 characters


USER

  1. Start the program - to start the program, you can enter the name or path, depending on whether the program is registered in the system:

    • First name only (with or without extension): You can use for programs that are written in Windows PATH system variables or are located in system folders. For example, an entry like notepad, calc, chrome, vlc or cmd they will work immediately because Windows knows where to look for them.

    • Full path: If the program is not system or located in a specific location (eg game, special tool or custom installation), you must specify the full path to the executable file with or without quotes, along with the .exe extension. For example: C:\Program Files\MyProgram\program.exe.

  2. Open a file or folder - you must always use the full path to the source to open folders or files.

    • Mandatory file path: Unlike programs, files (such as dispatch.xlsx, image.png or notes.txt) almost always require the full path to the location where the file is located (e.g. D:\Documents\Work\troskovnik.xlsx). Windows will then automatically call the associated program (Word, Excel, PDF reader) to open the file.

    • Opening the folder: The same thing applies if you want the entire folder to be opened in Windows Explorer by clicking the button - enter the full path to the folder, e.g. D:\Images\Annual2026

  3. New abbreviation - Sends individual keys or shortcuts from the keyboard to the computer (eg Copy - CTRL+C or Paste CTRL+V)

    • Note in which format abbreviations are written:

      Instead of writing the word 'Ctrl' or 'Alt', use the following characters for the computer to recognize the pressure correctly:

      ^ - indicates the Ctrl key

      + - indicates the Shift key

      % - indicates the Alt key

      ^% - indicates the right Alt (Alt Gr)

      Special keys (Enter, Escape, F1-F12, etc.) are placed in curly brackets.

      Examples of abbreviations:

      Ctrl + C (Copy) ➔ Type: ^c

      Ctrl + V (Paste) ➔ Type: ^v

      Ctrl + Shift + Esc (Task Manager) ➔ Type: ^+{ESC}

      Right arrow ➔ Enter: {RIGHT}

  4. Multiple Abbreviation- unlike normal abbreviations, here you can combine several abbreviations into a command, something like a macro command. Enter each abbreviation separated by a comma. 

    The application will execute them in the correct order with a short pause between each press. Examples:

    Mark all, then copy ➔ Type: ^a, ^c

    Paste and press Enter ➔ Type: ^v, {ENTER}

    Save, then close the window ➔ Type: ^s, %{F4}

  5. Windows shortcut - executes system shortcuts that use the Windows key in combination with another character (eg Win + D).

  6. Website - just copy the web address in the field Path or command example: https://tehnofrik.com/

  7. Switch to previous window - switches between the last two active windows


ADVANCED

  1. Open in Command Prompt (CMD) - opens the currently open folder in Terminal (CMD)
  2. Open in Powershell - opens the currently open folder in Powershell
  3. Run command via terminal (CMD) - executes the command sent through the terminal (CMD)
  4. Execute the command via Powershell - executes the sent command via Powershell
  5. Open a terminal (CMD) and execute the command - executes the sent command through the terminal (CMD) but the terminal window remains open
  6. Open Powershell and execute the command - executes the sent command via Powershell, but the Powershell window remains open
  7. Run the AutoHotkey script - Powered by AutoHotkey (.ahk) script on the computer. Full path required.

OBS

  1. See everything about OBS settings and options HERE.

AUDIO

  1. Sound volume (applications) - slider to adjust the sound volume. If you do not enter 'targeted program' the sound of the computer itself is regulated if you enter, for example, 'chrome' only the volume of the Google chrome browser is regulated.
  2. Mute/unmute (apps) - turns off/on the sound. It works on the same principle as the volume without the selected 'target program' or with selected.
  3. Microphone volume - slider for adjusting the main microphone in windows.
  4. Mute/unmute microphone - turns off/on the main microphone in windows.

TEMPLATES

  1. There are some ready-made commands that you can use immediately without manual input, with the ability to change them if necessary.

Important - window focus: Keyboard shortcuts and media commands or commands act on the window that is currently active (focused) on your computer, just like if you pressed those keys on a physical keyboard. Before sending the command, check that the desired program is on top, or the window is active. Except in cases where you have selected 'Target program', then the command is executed in that program.

How to add your first command?

Creating a custom button in LanDock is extremely easy. In just a few seconds, you can create a button that will open the desired program, web page or execute a certain shortcut on your computer.

  1. Click on 'Add' (+): In the lower right corner of the screen, press the orange plus button.

  2. Enter name: In the field 'Button Name' type the text that will be written on the screen (eg Copy, YouTube, Mute). If you choose one of the ready-made command templates, you do not need to enter the Command Name, it is filled in automatically.

  3. Select Command: Click on the command selection button. Here you select the command you want to make and you can use our built-in menu with templates where the most common commands are already prepared (sound control, most common shortcuts, opening programs, etc.).

  4. Command or path:  Here you enter the command to be executed on the computer, if you are doing a completely manual command (eg opening your private folder), here you enter the path itself (see command description).

  5. Target program (optional): Here you specify the specific program in which the command will be executed. If the field is empty, the command is executed on the currently active window.

  6. Ask for confirmation before executing: If you check the box, then every time you click on the command button, you will receive a confirmation warning before executing the command itself.

  7. Design a button: Choose the background color and icon that best describes your command. Click Save and your button is ready to use!

NOTE: To edit existing buttons, long press the button and a dialog for editing the button command will open.

Integration and commands for OBS Studio

How to open a program, folder or file on your computer

Other settings, adding panels, import and export, changing the location of buttons

To make it easier to get started, you can download a 12-button template for an example of how it works on your mobile phone.

REMARK!

Free and PRO version

You can use LanDock completely free and without ads! The free version allows you to create 1 screen (Panel) with a maximum of 12 buttons, which is quite enough for basic computer control.

For advanced users who want an unlimited number of screens and buttons, a PRO version is available through a simple, one-time in-app purchase. Your purchase also directly supports the further development of our tools.

Share the article