LanDock & OBS Studio – Installation, Connection and Management Guide

This guide explains how to connect your PC (OBS Studio) to the LanDock Android app and details all available commands to control live streams, recordings, scenes, audio sources and multimedia.

Setting up the OBS Studio server on your computer

LanDock communicates with OBS via the official WebSocket protocol. In order for the connection to work, it is necessary to configure the server once in OBS Studio:

  1. Open OBS Studio on your computer.

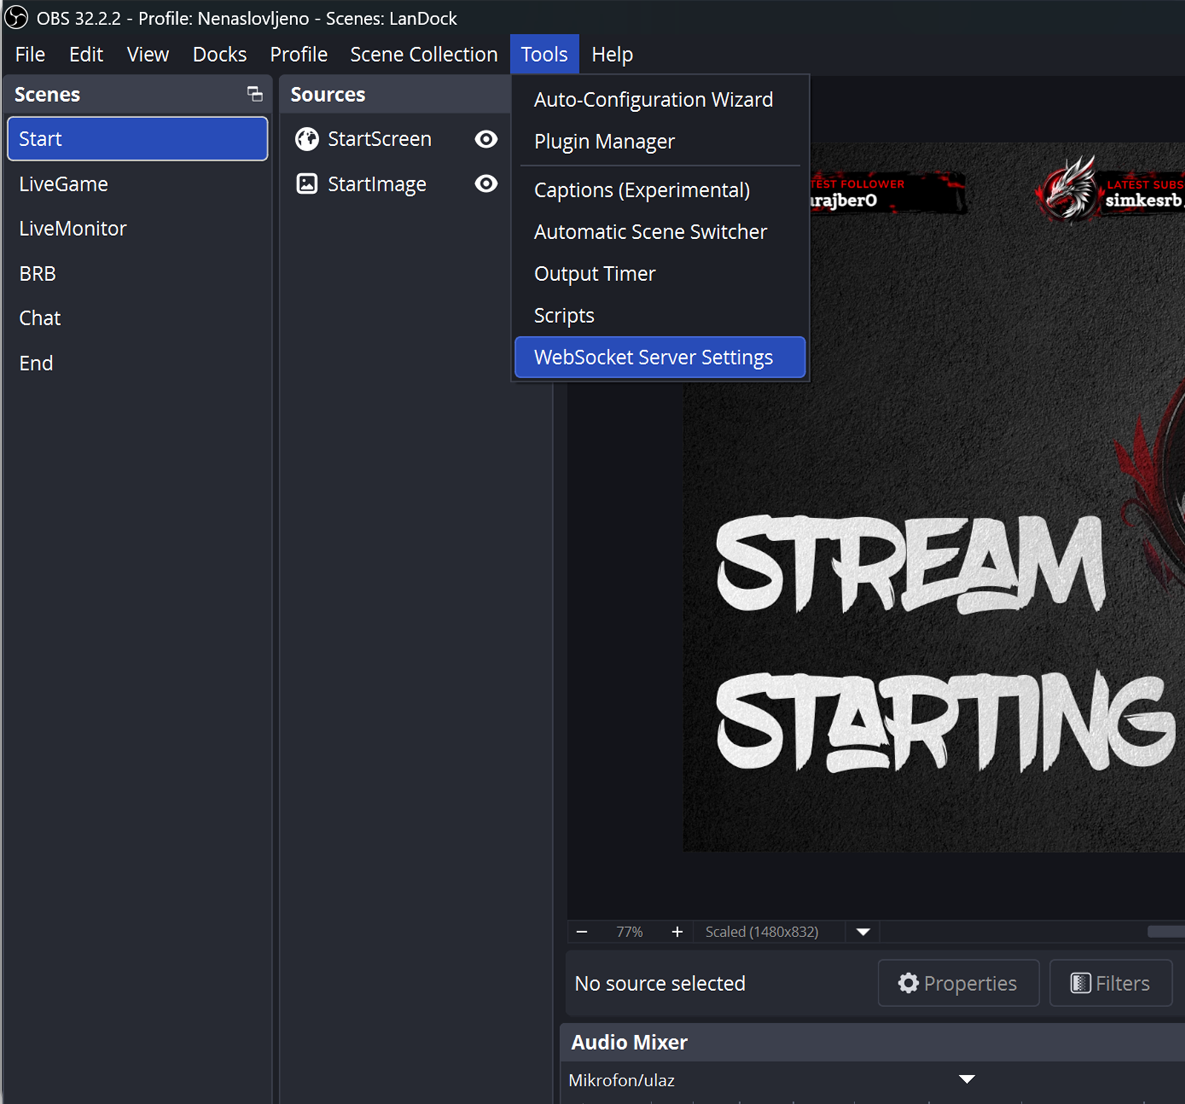
  2. In the top menu, click on Tools -> WebSocket server settings.

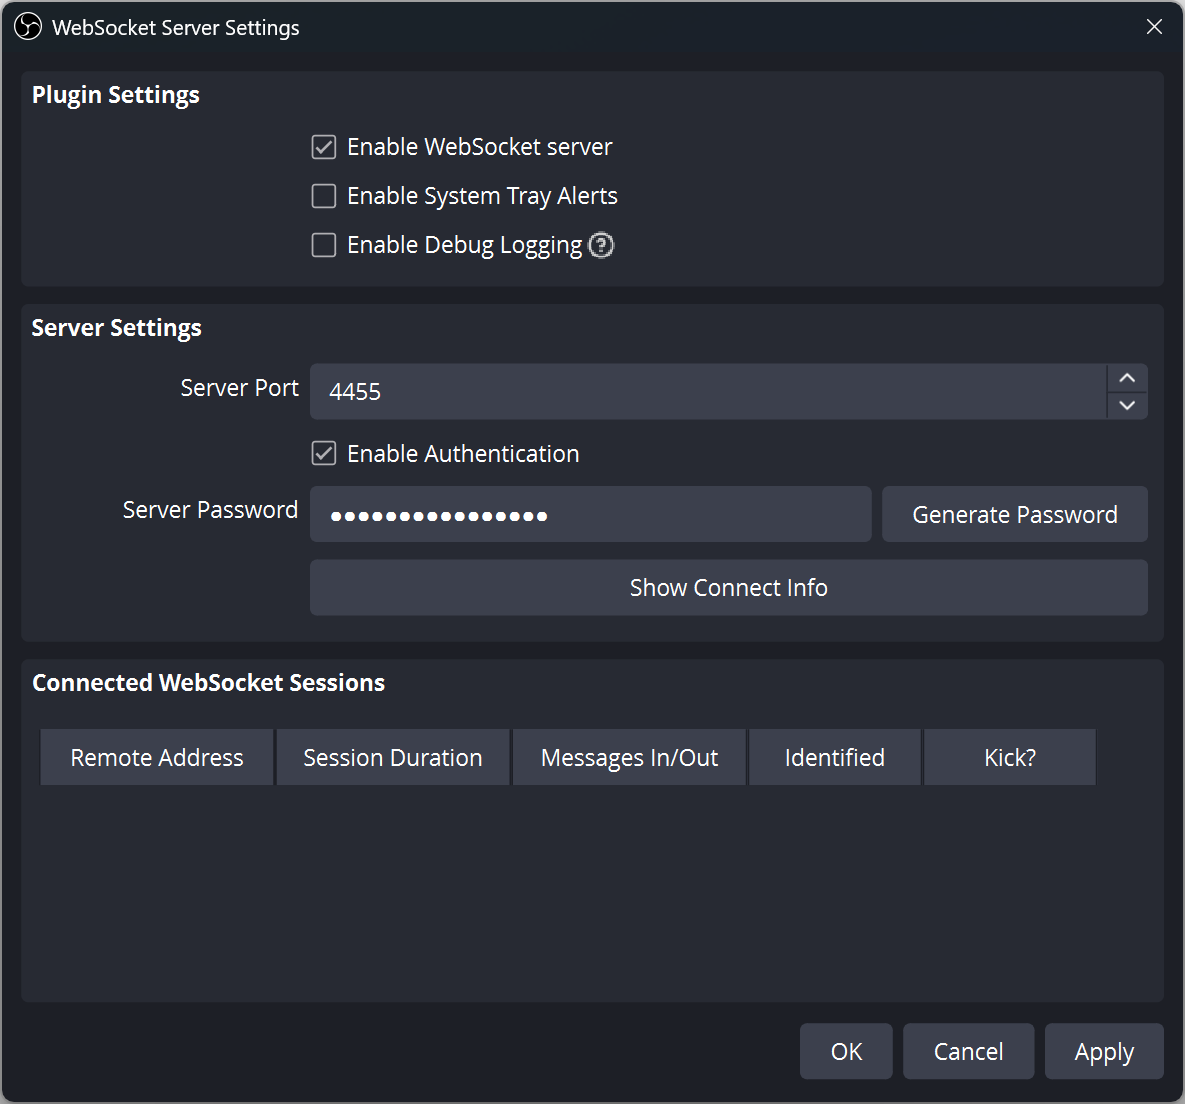
  3. Tick ​​the option Enable WebSocket server.

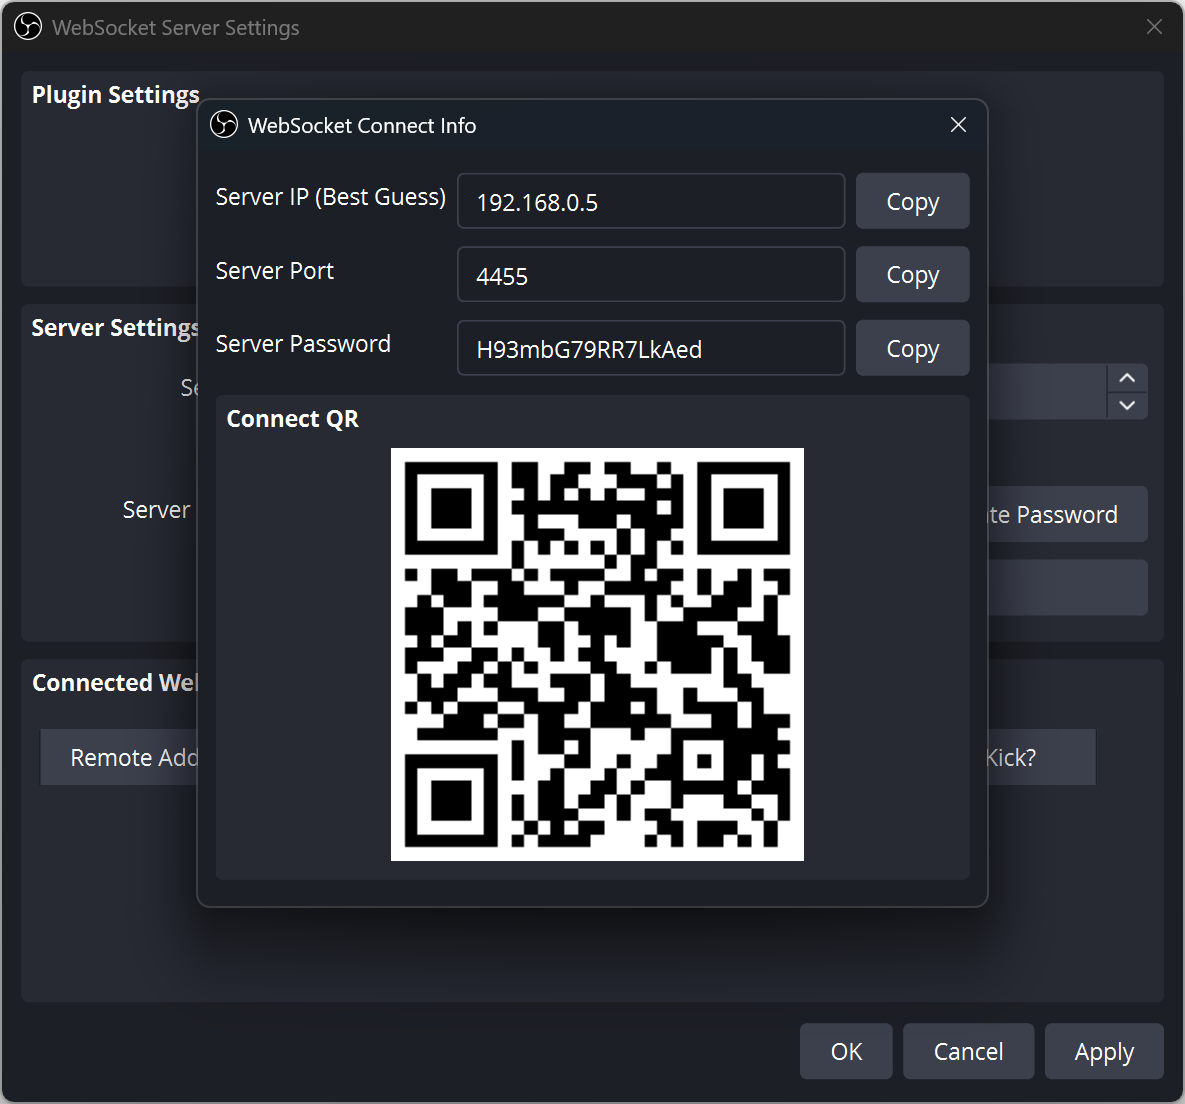
  4. Record or adjust port (default is 4455) and enter the security code the password (Password). To view details, click on 'Show connection information'.

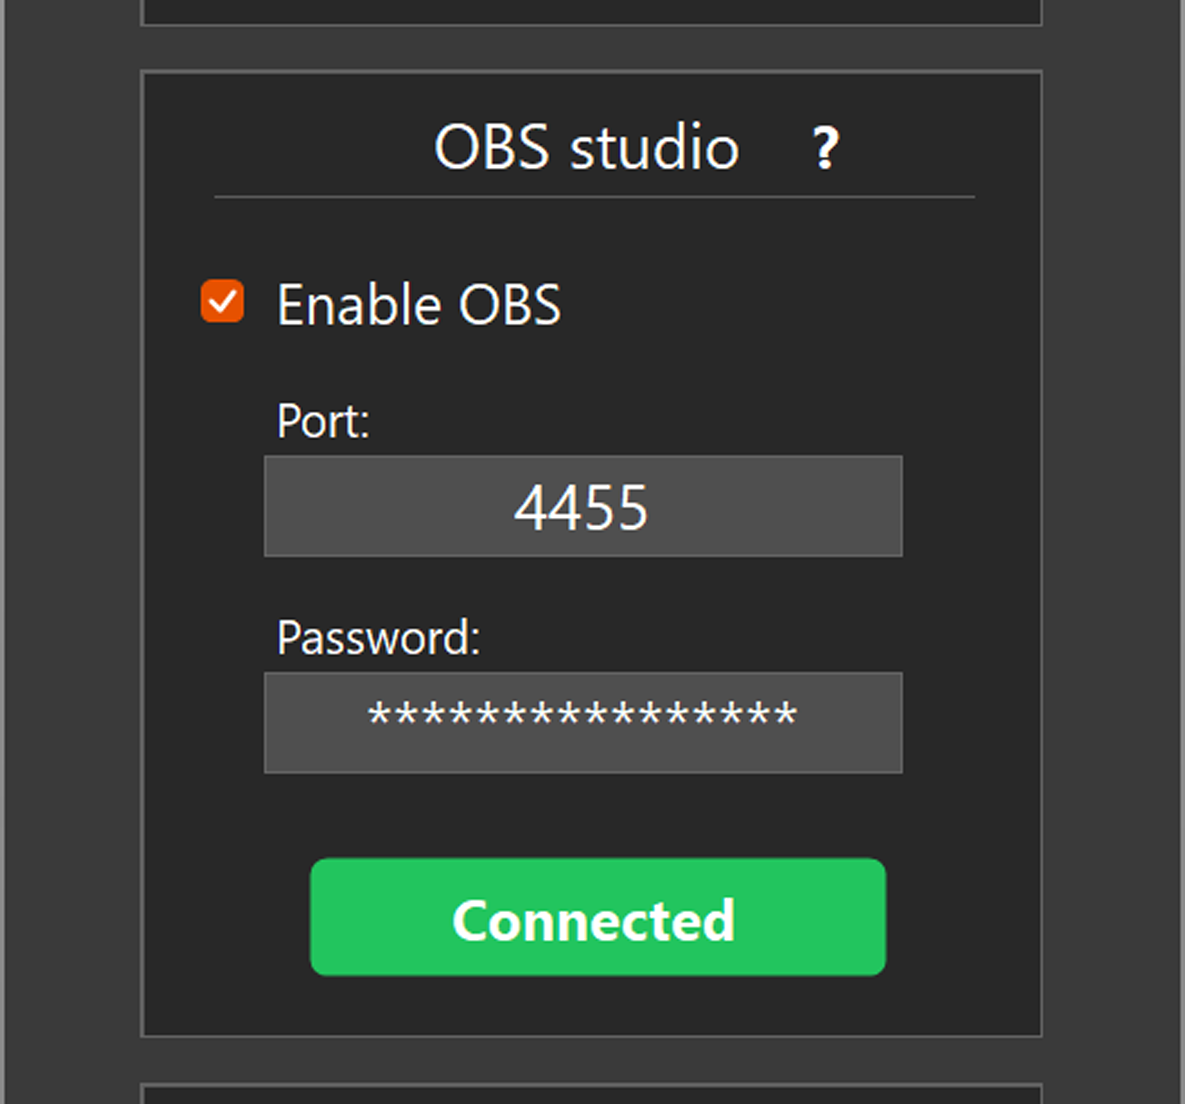
  5. In the LanDock Windows server application (LanDockServer) in the section for OBS, click on the box 'Enable OBS' type the same one port and the password and click Connect.

  6. Once you set these settings, the LanDock server will connect automatically every time you start OBS.

How does communication and execution of orders work?

  • Direct WebSocket Connection: Unlike keyboard shortcuts that require window focus, OBS commands travel directly over a local network WebSocket connection between the LanDock Server and OBS. This means that OBS can be down, minimized or in the background, and commands will be executed instantly.

  • Smart protection (Anti-Fail): The buttons for starting the stream (StartStream) have built-in protection - if the stream is already in progress (LIVE), clicking the button again is silently ignored. To stop the stream, you need to create a separate Stop Stream button.

  • The button for recording or 'Start recording' (ToggleRecord) works as a switch (toggle) because the same button is used to turn recording on and off.

  • Automatic status refresh: The LanDock application on the mobile phone checks the OBS status in real time (via background ping) and automatically turns on the visual indicators:

    • pulsating LIVE when streaming is started

    • REC framework, PAUSED recording status

    • ON/OFF tags for sound and microphone).

STREAM AND RECORDING

  1.  Start the stream - starts streaming

  2. Stop the stream - stops the stream (separate buttons are recommended for safety, you can mark each button with a box 'Ask for confirmation before executing' so as not to accidentally stop or start the stream.

  3. Start/stop recording - starts recording with the same button you stop recording

  4. Pause/resume recording - pauses or resumes recording with the same button (recording cannot be paused if recording quality is set to 'Same as stream').

NOTE: All buttons have an indication as to which activity is current. (eg: LIVE, REC, PAUSED)

SCENES

  1. Choose a scene - here you can make a button for each scene you have and by clicking on them you switch between scenes.

    • You can manually enter the name of the scene from obs, but it must be the correct name

    • Simply click on 'Get list from OBS' and you will be shown all the scenes you have in obs

    • The active scene is indicated by displaying the 'HE' and a green circle

SOURCES

  1. Show/hide browser - here you select the browser source and then show or hide it in the active scene.

  2. Show/hide camera - here you select cameras and show or hide them in the active scene.

  3. Show/hide media- here you select media (video, image, music...) and show or hide them in the active scene.

  4. Show/hide recording - here you select recording (game, window, screen) and show or hide them in the active scene.

  5. Show/hide text- here you select text and show or hide them in the active scene.

  6. Turn on/off the virtual camera - here you turn on or off the virtual camera.


As with scenes and other similar parts, you can enter the name of the source from obs, but it must be the correct name.

Simply click on 'Get list from OBS' and you will be shown a list of all available sources from the selected category that you have in obs.

An active source is indicated by displaying the 'HE' or 'OFF' and the green or red circle depends on the activity.

NOTE: Resource management is possible in the currently active scene. If there is no selected source in the active scene, you will receive the message: 'Unavailable in the active scene'

AUDIO

  1. Turn on/off the microphone - here you select the microphone and turn it off or on.

  2. Turn on/off computer sound - here you select the sound source on your obs and turn it off or on.

  3. Turn on/off application sound - here you select the sound of the application and turn it off or on.

  4. Turn media sound on/off - here you select the media (video, music...) and mute or unmute its sound.

  5. Mute browser source sound - here you select the source of the browser and turn off or on its sound.

  6. Turn on/off camera sound - here you select the camera and turn its sound off or on.

  7. Monitoring ON/OFF - here you select the sound source and turn monitoring on or off.


As with other similar parts, you can enter the name of the source from obs, but it must be the correct name.

Simply click on 'Get list from OBS' and you will be shown a list of all available sources from the selected category that you have in obs.

An active source is indicated by displaying the 'HE' or 'OFF' and the green or red circle depends on the activity.

NOTE: Sound source management is independent of which scene you are in.

VOLUME ADJUSTMENT

Unlike classic buttons. Here you have a wide button or a slider on which you adjust the sound volume of the selected source.

  1. Microphone volume - here you regulate the volume of the microphone.

  2. Computer volume- here you regulate the volume of the computer, that is, the selected main sound source.

  3. Application volume - here you regulate the volume of the selected application source.

  4. Media volume - here you regulate the volume of the selected media source.

  5. Browser volume - here you regulate the volume of the selected browser source.

  6. Camera volume - here you regulate the volume of the selected camera.


As with other similar parts, you can enter the name of the source from obs, but it must be the correct name.

Simply click on 'Get list from OBS' and you will be shown a list of all available sources from the selected category that you have in obs.

An active source is indicated by displaying the 'HE' or 'OFF' and the green or red circle depends on the activity.

NOTE: Sound source management is independent of which scene you are in.
BUFFER

For the commands to work you must first enable the Replay Buffer in obs.

Turn it on by clicking on Settings - Exit, and then depending on if you have selected the 'Simple' view, scroll at the bottom of the page. 'Advanced' has its own tab.

  1. Start/stop buffer - here you start or stop the operation of the buffer (it does not save the clip).

  2. Save clip - saves the clip if the buffer is running.

PROFILES and SCENE COLLECTIONS

  1. Change OBS profile - here you can change the profile in obs if you have different profiles.

  2. Change scene collection - here you can change the collection of scenes if you have more (eg: collection of scenes for recording, for streaming, etc.

Share the article